![[Swift] UICollectionView 내부 내용에 따른 Cell 동적 높이 설정법](https://img1.daumcdn.net/thumb/R750x0/?scode=mtistory2&fname=https%3A%2F%2Fblog.kakaocdn.net%2Fdna%2FdFTSh6%2Fbtsz2VdtWKj%2FAAAAAAAAAAAAAAAAAAAAAI3YDsCwL3UMJQsUb-54f5gkLL3SPX2Nz-J5hQE1Fh5e%2Fimg.png%3Fcredential%3DyqXZFxpELC7KVnFOS48ylbz2pIh7yKj8%26expires%3D1753973999%26allow_ip%3D%26allow_referer%3D%26signature%3DJ3ci6%252FzQOtqKd2yh9riPTYxEBt4%253D)
콜렉션 뷰에서 내부 셀의 내용에 따라 높이를 각기 유동적으로 하고 싶을 때 사용하는 법이다.
요점은
let layout = UICollectionViewFlowLayout()
layout.estimatedItemSize = UICollectionViewFlowLayout.automaticSize
이것을 잘 사용해보자.
우선 뷰컨트롤러 안에 콜렉션 뷰를 만들어보자.
class TempViewController: UIViewController, ReactorKit.View {
...


   let contentCollectionView: UICollectionView = {
        let layout = UICollectionViewFlowLayout()
        layout.estimatedItemSize = UICollectionViewFlowLayout.automaticSize
        layout.minimumInteritemSpacing = 16
        layout.minimumLineSpacing = 16
        layout.scrollDirection = .vertical
        layout.sectionInset = UIEdgeInsets(top: 0, left: 0, bottom: 0, right: 0)

        let view = UICollectionView(frame: .zero, collectionViewLayout: layout)

        view.contentInsetAdjustmentBehavior = .always
        view.showsHorizontalScrollIndicator = false
        view.register(TestCollectionCell.self, forCellWithReuseIdentifier: TestCollectionCell.reuseIdentifier)


        return view

    }()
그리고 viewDidLoad에 delegate와 dataSource를 설정해주고
override func viewDidLoad() {
     super.viewDidLoad()
     ...

     contentCollectionView.dataSource = self
     contentCollectionView.delegate = self
     view.addSubview(contentCollectionView)

     ...
  }
UICollectionViewDelegate, UICollectionViewDataSource을 잘 작성해 보자
extension TempViewController: UICollectionViewDelegate, UICollectionViewDataSource {
   func collectionView(_ collectionView: UICollectionView, numberOfItemsInSection section: Int) -> Int {
        switch collectionView {
           case contentCollectionView:
              return 20

           default:
              return 0
        }

   }

   func collectionView(_ collectionView: UICollectionView, cellForItemAt indexPath: IndexPath) -> UICollectionViewCell {
      switch collectionView {
         case contentCollectionView:
             let cell = collectionView.dequeueReusableCell(withReuseIdentifier: TestCollectionCell.reuseIdentifier, for: indexPath) as! TestCollectionCell
             return cell

          default:
             return UICollectionViewCell()
       }

    }
}
다음은 UICollectionViewDelegateFlowLayout을 설정해보자
extension TempViewController: UICollectionViewDelegateFlowLayout {
    func collectionView(_ collectionView: UICollectionView, layout collectionViewLayout: UICollectionViewLayout, sizeForItemAt indexPath: IndexPath) -> CGSize {

       switch collectionView {
          case contentCollectionView:
             // 해당 셀의 예측되는 크기를 작성해야 함.
             // reuse 되면서 셀이 다시 그려지기 전 셀의 크기를 해당 크기로 맞춰놓고 시작함.
             // 그 후 automatic 을 통해 constraints 에 의해 셀 크기를 계산해 모양을 다시 잡아줌.
             // 즉, 예측되는 크기와 실제 크기가 차이가 크면 reuse 될때 사이즈가 바뀌며 버벅거리는 것처럼 보이게 되버림.
             // 최대한 예측되는 크기와 실제 크기의 괴리를 줄이는게 좋음
             return  CGSize(width: view.frame.width, height: 500)

          default:
             return .zero
       }
    }
 }
이제 cell 에서 containerView를 만들고 그 안에서 셀의 크기를 잡아주도록 constraints를 짜보자.
class TestCollectionCell: UICollectionViewCell {

    static let reuseIdentifier = "TestCollectionCell"

    let containerView = UIView()

    let headerView = UIView()

    let profileImgView = UIImageView()

    let profileNickLbl = UILabel()

    let imgView = UIImageView()

    let descLbl = UILabel()

    var deviceSize: CGSize = .zero


    var isHeightCalculated: Bool = false

    override init(frame: CGRect) {
        super.init(frame: frame)
        viewConfigure()
        constraintConfigure()
    }

    required init?(coder: NSCoder) {
        super.init(coder: coder)
    }

    override func prepareForReuse() {
        super.prepareForReuse()
//        isSelected = false
//        titleLbl.text = "빈 태그"

    }

    override func layoutSubviews() {
        super.layoutSubviews()

    }

    func viewConfigure() {
        deviceSize = UIScreen.current?.bounds.size ?? .zero

        self.clipsToBounds = true
//        self.layer.cornerRadius = 20
        self.backgroundColor = .blue

        self.contentView.addSubview(containerView)

        headerView.backgroundColor = .green
        containerView.addSubview(headerView)

        profileImgView.clipsToBounds = true
        profileImgView.layer.cornerRadius = 16
        profileImgView.backgroundColor = UIColor(named: "StoryGray3")
//        profileImgView.image = UIImage(named: "a")
        headerView.addSubview(profileImgView)

        profileNickLbl.text = "Name"
        profileNickLbl.textColor = UIColor(named: "StoryGray6")
        profileNickLbl.font = .systemFont(ofSize: 14, weight: .bold)
        headerView.addSubview(profileNickLbl)

        imgView.image = UIImage(named: "img_estate_default")// ,img_banner_apart_req
        imgView.contentMode = .scaleAspectFill
        containerView.addSubview(imgView)

        descLbl.text = "가나다라마바사아자차카타파하 가나다라마바사아자차카타파하 가나다라마바사아자차카타파하 가나다라마바사아자차카타파하 가나다라마바사아자차카타파하"
        descLbl.numberOfLines = 0
        containerView.addSubview(descLbl)


    }


    func constraintConfigure() {

        // 셀을 두르는 View
        containerView.snp.makeConstraints { make in
            make.edges.equalToSuperview()
        }

        headerView.snp.makeConstraints { make in
            make.top.equalToSuperview() // containerView의 상단 끝
            make.leading.trailing.equalToSuperview() // containerView의 양옆 끝
            make.width.equalTo(deviceSize.width)
            make.height.equalTo(48)
        }

        profileImgView.snp.makeConstraints { make in
            make.top.equalToSuperview().offset(8)
            make.leading.equalToSuperview().offset(20)
            make.width.height.equalTo(32)
        }

        profileNickLbl.snp.makeConstraints { make in
            make.leading.equalTo(profileImgView.snp.trailing).offset(8)
            make.centerY.equalTo(profileImgView)
            make.trailing.equalToSuperview().offset(-20)
        }

        imgView.snp.makeConstraints { make in
            make.top.equalTo(headerView.snp.bottom)
            make.centerX.equalToSuperview()
            make.width.equalTo(deviceSize.width)
            // 중요!!!셀의 높이에서 가장 영향이 높은 것에 우선순위를 주어 auto height를 할수 있도록함.
            // priority를 주지 않게되면 기존의 automatic으로 예측되는 높이와 실제 높이에서 우선순위를 둘수 없어 constraints가 깨지는 경고를 줌.
            // 즉 높이를 좌우 하는 쪽에 priority 를 주어 예측 셀의 높이를 확실하게 해주자.
            // UILabel의 경우에는 initial 사이즈가 있기때문에 만일 view에서 UILabel을 가지고 있으면 constraints가 깨지지않는 경우도 있다.
            // 즉 모든 높이를 정확히 가질 땐 priority를 설정해주자. (auto일경우에)
            make.height.equalTo(320).priority(999)
        }

        descLbl.snp.makeConstraints { make in
            make.top.equalTo(imgView.snp.bottom)
            make.centerX.equalToSuperview()
            make.width.equalTo(deviceSize.width)
            make.bottom.equalToSuperview() // containerView의 하단 끝
        }

    }


}
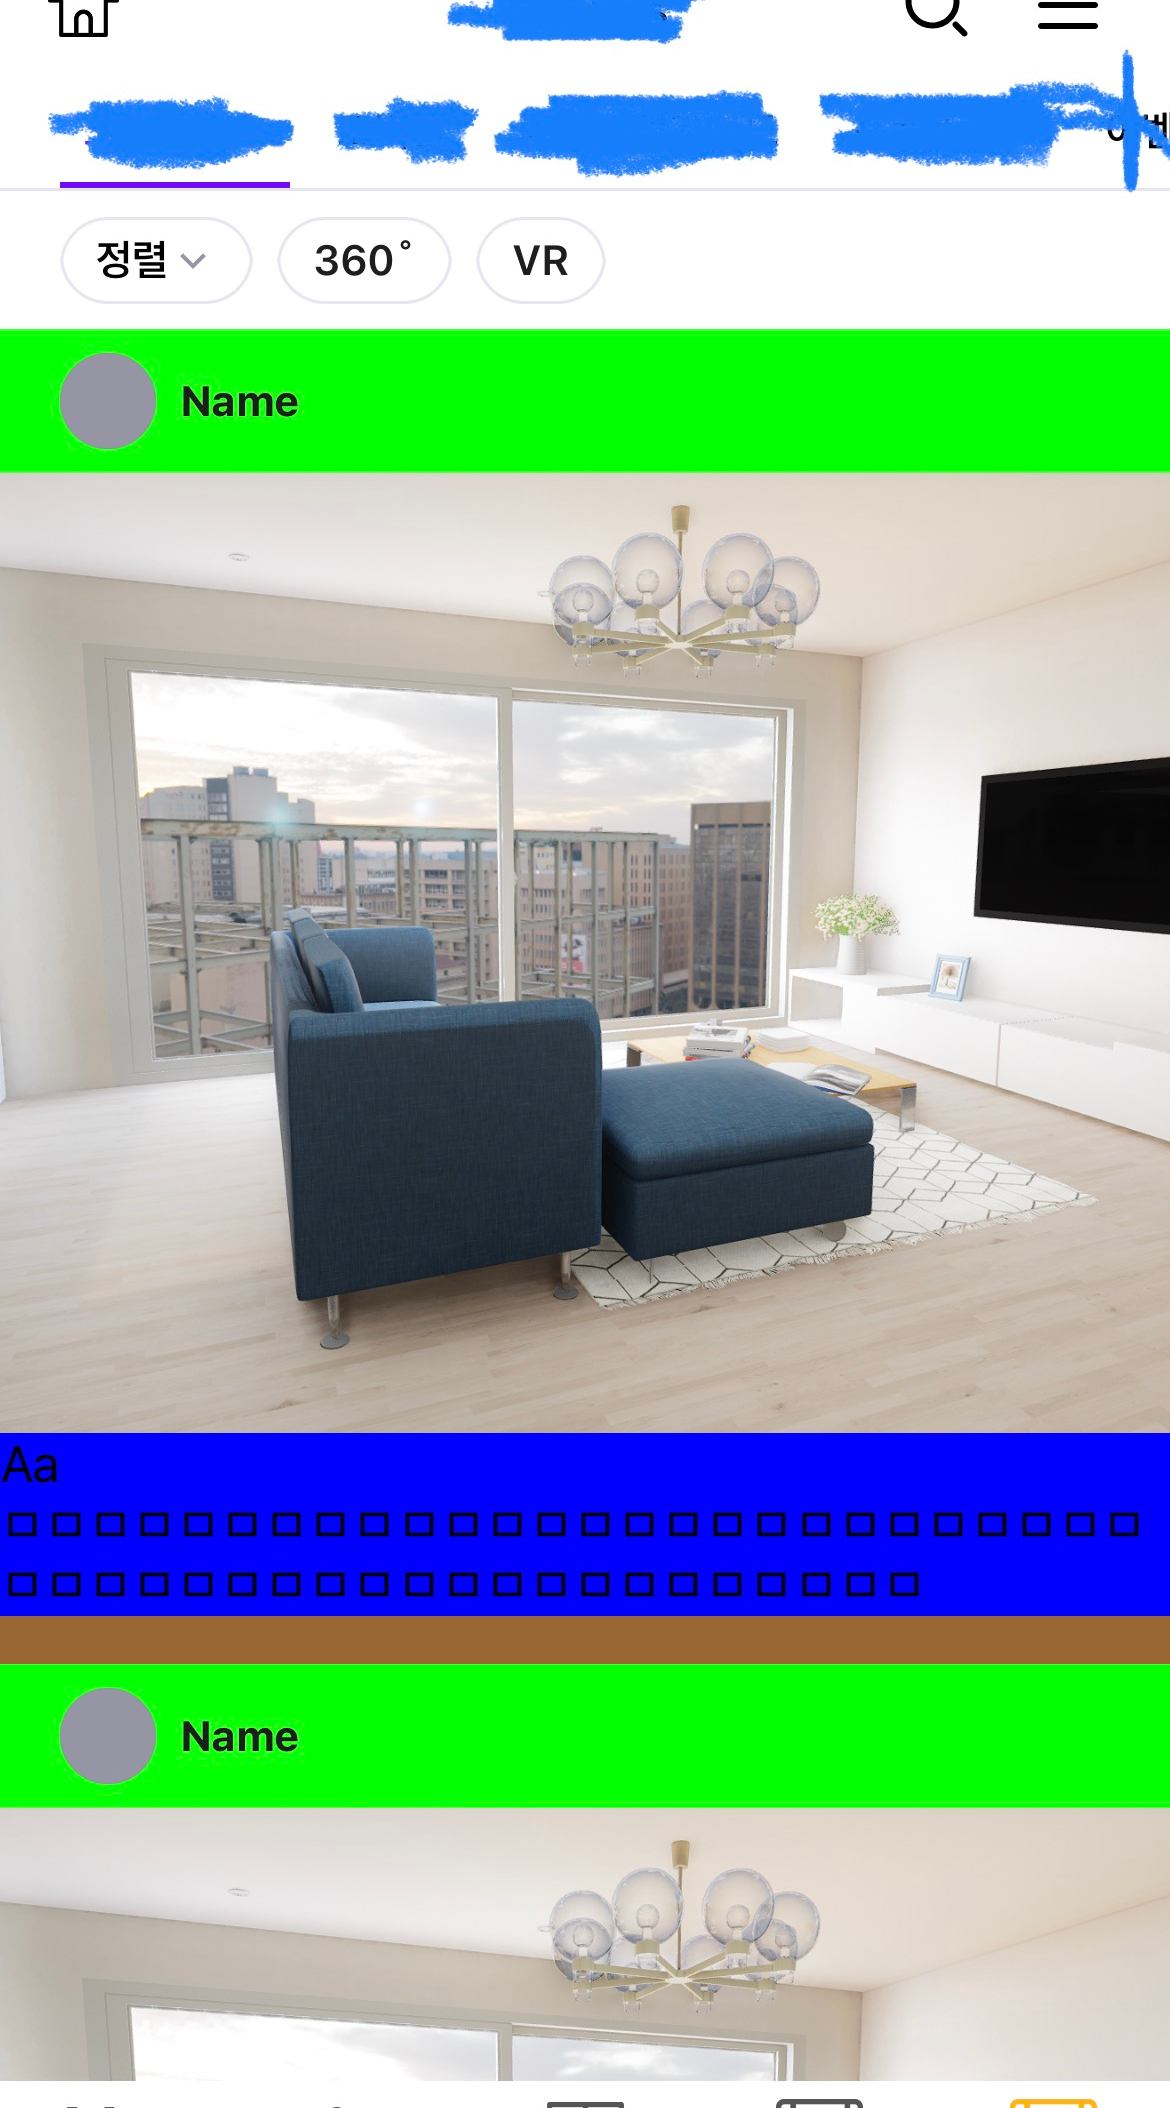
이렇게 테스트 해보면
하단 descLbl 의 길이와 높이가 동적으로 바뀌어도 셀의 크기도 그것에 맞추어 같이 바뀌는 것을 볼 수 있다.
'Swift' 카테고리의 다른 글
| [Swift] 좌우 무한 collectionView 를 만들어 보자 (2) | 2024.01.05 |
|---|---|
| [Swift] 상단 탭바 페이지 뷰컨트롤러 만들기 (Upper Tab Page View) (0) | 2024.01.02 |
| [Swift] NavigationController와 TabBarContoller 무엇으로 감쌀지? (0) | 2023.11.02 |
| [Swift] 앱스토어 셀 클릭 시 transition animation 적용하기 (0) | 2023.10.26 |
| [Swift] SceneKit 사용법 (0) | 2023.06.15 |